Introduction
Laminate flooring has become one of the most popular flooring options in the United States because it offers the appearance of hardwood at a lower cost. Homeowners like laminate floors because they are stylish, durable, easy to install, and simple to maintain. Modern laminate flooring also comes in many colors and textures, making it suitable for almost every room in the house.
Even though laminate flooring is durable, it is not completely damage-proof. Over time, scratches, dents, water damage, bubbling, gaps, and loose planks can appear. Many homeowners think the only solution is replacing the entire floor, but that is often unnecessary. In many cases, laminate flooring can be repaired successfully without a full replacement.
Learning how to repair laminate flooring correctly can save money, improve the appearance of the home, and extend the life of the floor for many years.
Common Causes of Laminate Flooring Damage
Laminate floors experience daily wear and tear, especially in busy households. Heavy foot traffic is one of the biggest causes of surface damage. Families with children and pets often notice scratches and dents more quickly than low-traffic homes.
Furniture movement is another common problem. Chairs, tables, and sofas dragged across the floor can create visible scratches and chips. Pet claws may also damage the surface over time.
Water is one of the most serious threats to laminate flooring. Unlike waterproof vinyl flooring, laminate contains a fiberboard core that absorbs moisture. Water spills, plumbing leaks, and high humidity levels can cause swelling and warping.
Improper installation may also lead to flooring problems. If expansion gaps are too small, the floor may buckle when temperatures change. Uneven subfloors can create movement and squeaking sounds beneath the laminate planks.
Signs Your Laminate Floor Needs Repair
Some laminate flooring problems are easy to identify, while others develop slowly over time.
Scratches are usually the first visible sign of wear. Small scratches may only affect appearance, but deep scratches can weaken the protective surface layer.
Gaps between planks are another common issue. These gaps often appear because of seasonal expansion and contraction or installation problems.
Swollen edges usually indicate moisture damage. Water exposure causes laminate planks to expand and lift around the edges.
Bubbling or lifting sections may also suggest trapped moisture beneath the floor. Homeowners may notice squeaking sounds or soft spots while walking across damaged areas.
Identifying problems early helps prevent more expensive repairs later.
Step 1: Clean the Floor Thoroughly
Before making any repairs, clean the flooring carefully. Dirt, dust, and debris can interfere with repair materials and make damage harder to inspect.
Use a microfiber mop or soft broom to remove loose dirt. A vacuum designed for hard floors can also help clean cracks and edges.
Avoid soaking laminate flooring with water during cleaning. Excess moisture can worsen existing damage and create new problems.
A laminate-safe cleaner is the best option for preparing the surface before repairs.
Step 2: Repair Minor Scratches
Small scratches are one of the easiest laminate flooring problems to fix.
Many hardware stores sell laminate floor repair kits that include wax pencils, putty, or markers in different wood shades. These products are designed to blend scratches with the surrounding floor color.
Clean the scratch first and allow the area to dry completely. Apply the repair material carefully using the instructions provided with the product.
After filling the scratch, wipe away excess material with a soft cloth. Once dry, the scratch should become far less visible.
Repairing scratches quickly also helps prevent dirt and moisture from entering the damaged surface.
Step 3: Fix Deep Scratches and Chips
Deep scratches and chipped laminate require stronger repair solutions.
Laminate floor putty or filler works well for larger damage. Choose a repair color that matches the flooring as closely as possible.
Apply the filler carefully into the damaged area using a plastic putty knife. Smooth the surface evenly so the repair blends naturally with the surrounding planks.
Allow the filler to dry fully before walking on the repaired area.
In some cases, light sanding may help smooth the repair, but homeowners should be careful not to damage the laminate surface further.
Step 4: Repair Water-Damaged Laminate Flooring
Water damage is one of the most difficult laminate floor problems.
When laminate absorbs water, the boards often swell and lose their original shape. Small moisture issues may improve slightly after drying, but severe swelling usually requires plank replacement.
The first step is identifying and stopping the water source. Plumbing leaks, appliance leaks, or excessive humidity should be addressed immediately.
Use fans and dehumidifiers to dry the area completely. Moisture trapped beneath laminate flooring can create mold and subfloor damage.
If only one or two planks are damaged, replacing individual boards is usually possible without replacing the entire floor.
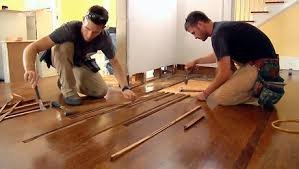
Step 5: Replace Damaged Laminate Planks
Replacing a single laminate plank may sound difficult, but it is often manageable with the right tools.
Carefully cut and remove the damaged plank using a circular saw or utility knife. Avoid damaging nearby planks during removal.
Clean the exposed subfloor thoroughly before installing the replacement board.
Some laminate floors use click-lock systems, while others use adhesive connections. Follow the flooring manufacturer’s installation method for the best results.
Matching the color and texture is important for creating a seamless appearance. Keeping extra planks from the original installation can make repairs much easier.
Step 6: Fix Gaps Between Laminate Planks
Gaps between laminate boards are common in areas with changing humidity levels.
A floor gap fixer tool can help move planks back into position without damaging the flooring surface.
Some homeowners use suction cups or rubber mallets carefully to close small gaps.
If the problem continues returning, the flooring may not have enough expansion space around the walls. Removing baseboards and adjusting the flooring edges may solve the issue permanently.
Step 7: Repair Squeaky Laminate Floors
Squeaking laminate flooring usually indicates movement beneath the surface.
Uneven subfloors are one of the most common causes of squeaks. Loose underlayment materials may also create noise.
Small squeaks can sometimes be reduced by adding powdered graphite between planks.
More serious squeaks may require lifting the flooring and repairing the subfloor underneath.
Professional inspection may be necessary if squeaking affects large areas of the home.
Preventing Future Laminate Floor Damage
Prevention is the best way to keep laminate flooring in excellent condition.
Furniture pads help protect against scratches and dents. Avoid dragging heavy furniture directly across the floor.
Area rugs and runners reduce wear in high-traffic spaces like hallways and living rooms.
Spills should always be cleaned immediately to prevent moisture absorption.
Maintaining stable indoor humidity levels also helps reduce expansion and contraction problems.
Best Cleaning Practices for Laminate Flooring
Proper cleaning extends the life of laminate flooring significantly.
Sweep or vacuum regularly to remove dirt and grit that may scratch the surface.
Use laminate-safe cleaning products instead of harsh chemicals or abrasive tools.
Steam mops are usually not recommended because excessive heat and moisture can damage laminate materials.
Microfiber mops work best for regular cleaning without leaving excess water behind.
Choosing Durable Laminate Flooring
Not all laminate flooring products offer the same quality.
Thicker laminate planks usually provide better durability and stability.
High-quality wear layers improve scratch resistance and protect the surface from fading.
Water-resistant laminate flooring is becoming more popular in kitchens and bathrooms because it offers better protection against spills.
Investing in quality materials often reduces long-term repair costs.
When to Hire a Professional
Some laminate flooring problems are too severe for DIY repairs.
Large water-damaged areas, structural subfloor issues, and widespread plank movement usually require professional help.
Professional floor repair companies have specialized tools and experience for handling difficult repairs safely.
Hiring experts may prevent further damage and ensure long-lasting results.
Cost of Laminate Flooring Repairs
Laminate floor repair costs vary depending on the type of damage.
Minor scratch repairs are usually inexpensive and may cost less than fifty dollars.
Replacing individual planks may cost a few hundred dollars depending on labor and material availability.
Large repairs involving water damage or subfloor replacement can cost significantly more.
Preventive maintenance is usually much cheaper than major flooring replacement.
Conclusion
Laminate flooring is a durable and affordable flooring solution for many American homes. Although damage can occur over time, many problems can be repaired without replacing the entire floor.
Simple repairs such as fixing scratches, replacing damaged planks, correcting gaps, and preventing moisture exposure can restore laminate flooring and extend its lifespan.
With proper care, maintenance, and timely repairs, laminate flooring can continue looking beautiful and performing well for many years.